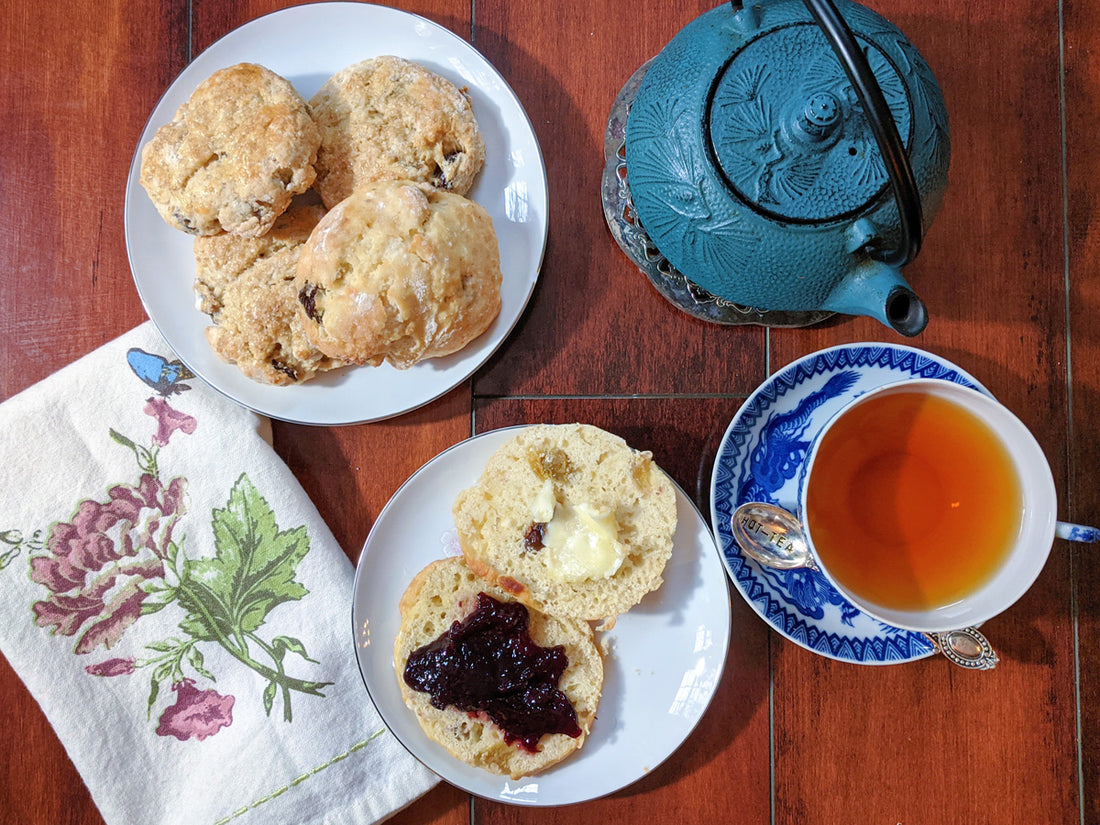
This winter, it’s these raisin scones. Mostly English, a little American, and so soft and flavorful with a touch of cinnamon -- all encased in a good crust. The first bite out of the oven reminded me of warm, homemade rice pudding eaten right out of the pot. The next time you need some home-cooked comfort, I suggest you reach for this raisin scone recipe.

English vs. American Scones
Raisin scones are traditionally English fare. English scones are round, somewhere between a biscuit and a cakey texture, are plain or with small fruit like raisins, and not nearly as sweet as their American counterparts. While our scones originated from England, American scones have evolved into their own pastry. They tend to be triangular, flavored with fruit and sweets, have more sugar, and maybe even some icing or sugar coating.
This raisin scone recipe falls somewhere in the middle. It leans more towards cakey biscuit, with a touch of cinnamon and coarse sugar sprinkled on top before baking.
English raisin scones are traditionally served as part of a cream tea with jam and clotted cream. They can also be enjoyed as part of a traditional three-course tea, with sandwiches and tiny, adorable desserts. The American tradition of brunch would also welcome these scones alongside salad, soup, or quiche. Whether you have them as part of a formal tea or slathered with butter alongside your morning cuppa, this raisin scone recipe won't disappoint.

Tips for the Perfect Raisin Scone
There are some tricks to making the perfect scone, and most of them revolve around butter. The key ingredient in any scone recipe is the butter, as it makes up a lot of the taste and all of the texture. It’s all about the butter, and yes, there is such a thing as fancy butter. My first experience with fancy butter was being introduced to Kerrygold Irish butter in college. The other day, my husband brought home a log of locally-made Amish butter that has been a dream to bake with and smear on everything.
Good butter makes a big difference in taste and quality and can usually be found in your grocery store, specialty food shop, or from your local farmers. That being said, your everyday grocery store brand unsalted butter will work just fine here. Don’t ever let a lack of fancy ingredients or tools discourage you from baking. Classic baking is done with your hands using what you’ve got at home.
The butter needs to be cold and kept cold as you mix it into the dry ingredients, which is called cutting in the butter. This creates pea-sized bits of butter in the dough, which melt and become pockets of air while the scones bake, making a light, fluffy pastry. This is best done with a pastry cutter, but you can also use two forks or your hands.
Usually, I recommend a rest in the fridge before baking to ensure the scones go into the oven cold, but this raisin scone recipe did better with a rest at room temperature, which allowed a slight expansion from the baking powder. It won’t be a dramatic rise like a yeasted dough, but it does make a big difference in the texture of the final product. Just make sure the area it is in isn’t so warm that the butter and dough melts. The benefit to making these in winter is the kitchen usually has some cool spots.

For this raisin scone recipe, we are using cake flour to get that soft, tender texture. If you don’t have cake flour, it can be made by replacing 1 tablespoon of flour with 1 tablespoon of corn starch per cup of flour. I find it easiest to measure the corn starch into a one-cup measuring cup, then spoon flour to fill it the rest of the way.
We will also increase the flakiness of the scone by folding the gathered dough onto itself three times, rotating it 45 degrees each time.
Scones are best right out of the oven, but they can be stored in an airtight container for four days. Scones can also be frozen, though I prefer to freeze the cut out dough and bake fresh scones straight from the freezer. You can do this by placing a plastic wrap-covered cookie tray full of shaped scones into the freezer (or fridge, if you don’t have the room) for several hours until they have hardened, and then placing them in a labeled freezer bag. Include the temperature to be baked at, and add a few more minutes in the oven to compensate for the frozen dough.
Raisin Scone and Tea Pairings
I paired these scones with my favorite Plum Deluxe blend, Pears and Cinnamon herbal tea, which brought out the touch of spice this raisin scone recipe calls for. You could also bring out the British side of this classic scone with Crème Brûlée Earl Grey or the celebratory lemon and elderflower Royal Wedding black tea. Another British style tea that would complement these scones is Plum Deluxe’s English Breakfast, House Blend, a “builder’s tea”-inspired blend of vanilla, Assam, and Ceylon.

Classic Raisin Scone Recipe
Ingredients:
- 3/4 cup raisins
- 2 and 3/4 cups cake flour (or flour and cornstarch mix -- see notes)
- 1 tablespoon baking powder
- 1/2 teaspoon cinnamon
- 1/2 teaspoon salt if using unsalted butter
- 1/3 cup sugar
- 1/4 cup butter
- 1/3 cup milk
- 2 teaspoons vanilla extract
- 3 eggs, separated
- Coarse sugar for sprinkling
Directions:
Pour boiling water over raisins in a small bowl. Let sit for 10 minutes, then drain. This will help plump up the raisins and bring out their sweetness.
While the raisins are soaking, sift or whisk the dry ingredients and sugar together.
Dice cold butter into chunks and cut or rub them into the dry ingredients. The butter is fully incorporated when it has formed pea sized balls in the dry mix.
In a separate bowl, mix together drained raisins, milk, vanilla, and 2 eggs.
Make a well in the center of the dry/butter mixture and pour in the liquid.
Stir with a spatula or dough hook, folding the liquid in until everything is well incorporated. Be careful not to overmix, finishing once all the dry has just been incorporated.
Dump dough onto a well-floured surface. Using your hands, gather dough and press it together until it forms a uniform, flattened mass.
Fold this mass over onto itself 3 times, rotating it 45 degrees each time. Press the dough into a circle that measures about 1 inch in height.
Using a floured 3-inch biscuit cutter, cut scones out and place three inches apart on a parchment paper- or silpat-lined baking sheet. Continue gathering dough scraps together and cutting out circles.
Let scones rest on the counter for one hour, allowing them to puff out at the base.
After the hour is up, preheat your oven to 390 degrees.
Whisk remaining egg and brush over just the tops of the scones. Sprinkle liberally with coarse sugar.
Bake until golden brown on top, checking them after 15 minutes. Let cool slightly before serving.
!['Chocoholic' Chocolate Tea Variety Pack [6-Pack Variety of Flavors]](http://www.plumdeluxe.com/cdn/shop/files/2.01-1800x1800-PlumDeluxe-DAJ-274695.jpg?v=1736886689&width=165)
![Patisserie Dessert Tea Variety Pack [6-Pack Variety of Flavors]](http://www.plumdeluxe.com/cdn/shop/files/4.01_-_1800_x_1800_-_Plum_Deluxe_-_DAJ_-_274695.jpg?v=1736886720&width=165)

